Add A Comment System To A Jekyll Blog Using Staticman - 2 / 2

This article is part of a series showing you how to quickly and freely build and host your own Jekyll blog on GitHub Pages. This series will also cover more advanced topics like adding a comment system directly in our code using Staticman and adding privacy-friendly but still free analytics using Umami.
I divided the tutorial into several parts:
- Introduction
- Setting Up
- Create Content
- Customize Display
- Commenting System Part 1
- Commenting System Part 2 <- you are here
- Analytics
In the last part, we added a functional comment system.
But there are still a lot of features that can be added, starting by allowing to respond to a comment.
Add a reply feature
To enable replying to a message, we need to know that a comment is a reply to another one.
To do so, we will add a parent_id field in our messages.
To allow it, add it to the allowedFields property in the staticman.yml file.
# staticman.yml
comments:
  allowedFields: ["name", "message", "parent_id"]
  ...
We do not add it to the requiredFields as only replies will have a parent message.
Then we need to add this field in our comment-form.html file.
<!-- _includes/comment-form.html -->
<form method="POST" action="{{ site.staticman_url }}" class="comment-form">
  <!-- options inputs -->
  ...

  <input
    name="fields[parent_id]"
    type="hidden"
    value="{{ include.parent_id }}"
  />

  <!-- user fields inputs -->
  ...
</form>
We store the parent_id field in a hidden input field using the value given by the include variable, which holds the include’s inputs.
Now we will add this form below each comment with its corresponding parent id. This will be the input form used to reply to this comment.
For each comment, we will also display its replies. To do so, we will recursively include comment-list.html with the parent_id as input.
<!-- _includes/comment-list.html -->
{% assign parent_id = include.parent_id | default: '' %}
{% assign comments = site.data.comments[page.slug] | where_exp: "item", "item.parent_id == parent_id" %}
{% assign sorted_comments = comments | sort: 'date' %}
{% for comment in sorted_comments %}
<div class="comment">
  <h3>{{comment.name}}</h3>
  <time
    class="post-meta dt-published"
    datetime="{{ page.date | date_to_xmlschema }}"
    itemprop="datePublished"
  >
    {%- assign date_format = site.minima.date_format | default: "%b %-d, %Y" -%}
    {{ comment.date | date:"%H:%M - %b %-d, %Y, %Y" }}
  </time>
  <p>{{comment.message | strip_html | markdownify }}</p>
  <div class="comment-reply">
    <p>Reply to {{ comment.name }}:</p>
    {% include comment-form.html parent_id=comment._id %}
    {% include comment-list.html parent_id=comment._id %}
  </div>
</div>
{% endfor %}
We now have the ability to reply each message and we display its replies under it.
Here is the result. I just added .comment-reply { padding: 15px; } in _sass/comments.scss to create a simple nested effect.
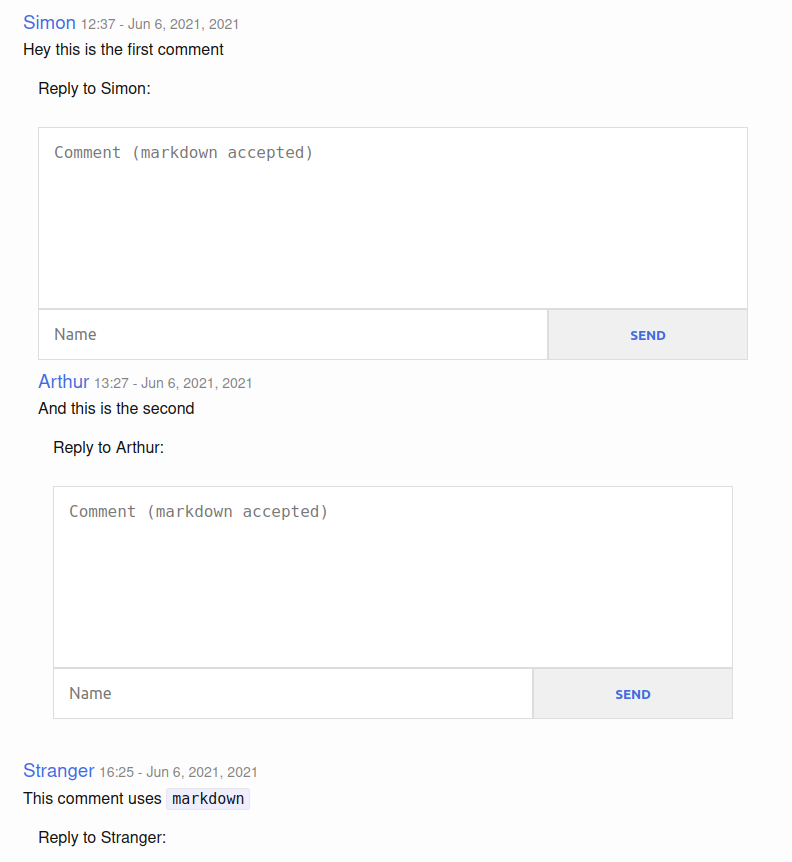
It’s a start, but we definitely don’t want to display all these reply boxes. They should appear only if we hit a reply button.
We will implement this feature using only HTML and CSS.
First, let’s update our comment reply box.
<!-- _includes/comment-list.html -->
...
<div class="comment-reply">
  <input id="reply-{{ comment._id}}" type="checkbox" class="checkbox" />
  <label class="open" for="reply-{{ comment._id }}">
    Reply to {{ comment.name }}
  </label>
  <label class="close" for="reply-{{ comment._id }}">X</label>
  {% include comment-form.html parent_id=comment._id %}
  {% include comment-list.html parent_id=comment._id %}
</div>
...
The display of the reply box is held by a checkbox. This one will not be displayed, but instead targeted by the two labels, reply to ... to open the reply box and X to close it.
Each label will be displayed depending on the checked property of the checkbox.
Here is the css code to make it work.
// _sass/comments.scss
...

.comment-reply {
  padding: 15px;
  padding-top: 5px;
  display: flex;
  flex-direction: column;

  .open {
    font-style: italic;
  }

  .close {
    display: none;
    align-self: flex-end;
    padding: 5px 10px;
    border: 1px solid #ddd;
  }

  .open:hover,
  .close:hover {
    cursor: pointer;
  }

  .comment-form {
    display: none;
  }

  .checkbox {
    display: none;
    &:checked ~ .open {
      display: none;
    }
    &:checked ~ .close {
      display: block;
    }
    &:checked ~ .comment-form {
      display: flex;
    }
  }
}
We now have a much cleaner reply feature!
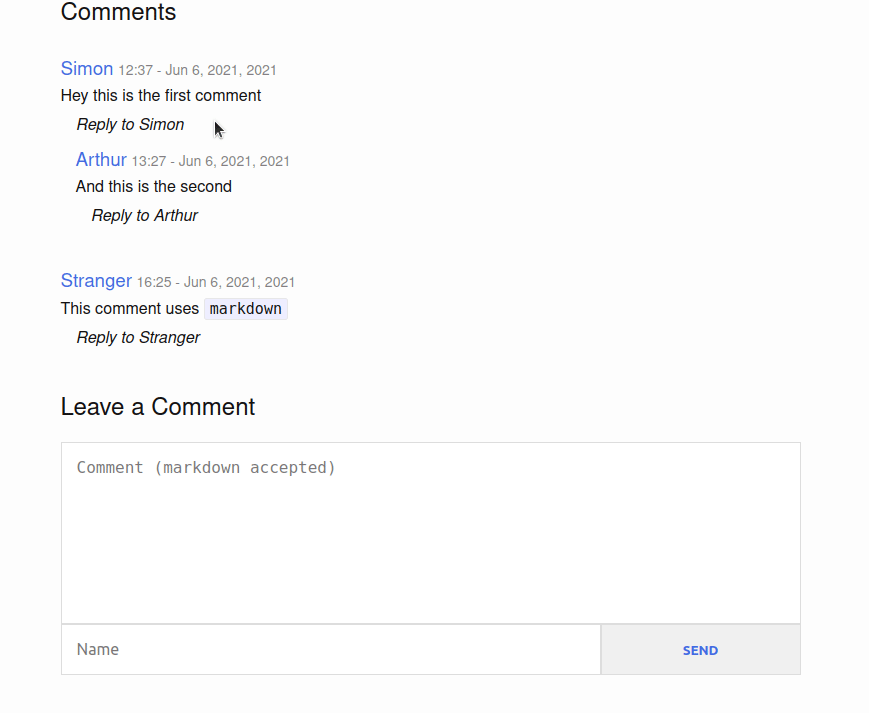
Use a markdown editor for messages
There are still a few improvements we can make to our new functionality. The first one is to use a markdown editor to allow your readers editing their comments in markdown easily
To do so, we will use a javascript markdown editor called SimpleMDE. This is quite an elegant solution as this library will target our textarea and replace them, which means that our solution will still work if one of our users has javascript disabled on its browser (who does that?).
First, we need to add the link to the library and its CSS in our head file.
<!-- _includes/head.html -->
<head>
  ...

  <!-- Simple Markdown Editor -->
  <link
    rel="stylesheet"
    href="https://cdn.jsdelivr.net/simplemde/latest/simplemde.min.css"
  />
  <script src="https://cdn.jsdelivr.net/simplemde/latest/simplemde.min.js"></script>
</head>
Then edit the comment form HTML to add a SimpleMDE instance attached to each textarea.
<!-- _includes/comment-form.html -->
<form method="POST" action="{{ site.staticman_url }}" class="comment-form">
  ...
  <textarea
    id="message-{{ include.parent_id }}"
    class="comment-message"
    name="fields[message]"
    placeholder="Comment (markdown accepted)"
    required
  ></textarea>
  ...
</form>

<script>
  var simplemde = new SimpleMDE({
    element: document.getElementById("message-{{ include.parent_id }}"),
    forceSync: true,
    spellChecker: false,
    status: false,
    placeholder: "Comment (markdown supported)",
  });
</script>
Note that I also added a unique id to the textarea based on the parent id.
I also added some changes to the editor style.
// _sass/comments.scss
...

.CodeMirror,
.editor-toolbar {
  border-radius: 0;
}
.CodeMirror,
.CodeMirror-scroll {
  min-height: 150px;
}
And here we are!
Better management of redirect
Currently, when we send a comment, we are redirected back to the article page. This behavior can be pretty confusing. Usually, we expect to get a notification that our comment was sent. Moreover, as our website need to be rebuilt to display the comment we sent, everything looks as if nothing happened!
Let’s work on improving this part.
To improve the experience, we will redirect readers to a thank-you page displaying that the comment will be readable soon.
Let’s create a new page, comment-success.markdown in our root directory, that will be almost the same as index.markdown.
<!-- comment-success.markdown -->
---
layout: home
list_title: Read Our Latest Posts
title: ''
---

## Thank you!

Your comment was successfully sent!

It will appear on our website soon.
Now change the redirect option in _includes/comment-form.html.
<!-- _includes/comment-form.html -->
<input
    name="options[redirect]"
    type="hidden"
    value="{{ 'comment-success' | absolute_url }}"
>
And that’s it!
Of course, there is a lot that could still be done to improve our comment system. But that’s already a good start, and we fully build it ourselves!
You can find the code for this part here.
That’s quite a journey since we started setting up our blog!
In our last chapter, we will see how to implement free privacy-friendly analytics.
Comments
captcha
Any guides for doing captcha?
Simon
You can find direction for adding recaptcha in the staticman documentation
Code Herb
Remarkable idea
TestUser
This was a good feature addon
Zed
Love it
Just need to try and implement it now! Hopefully it’ll work on
githubNetlify.Simon
Thanks Zed, no reason it would not!
Leave a Comment