Create Blog Posts And Static Pages With Jekyll and GitHub Pages

This article is part of a series showing you how to quickly and freely build and host your own Jekyll blog on GitHub Pages. This series will also cover more advanced topics like adding a comment system directly in our code using Staticman and adding privacy-friendly but still free analytics using Umami.
I divided the tutorial into several parts:
- Introduction
- Setting Up
- Create Content <- you are here
- Customize Display
- Commenting System - Part 1
- Commenting System - Part 2
- Analytics
Now that we have initialized our project, let’s see how to manage our content by:
- updating our home page to add some information before the list of blog posts
- adding a static page showcasing our best GitHub projects
- adding a new post to our brand new blog
Updating our home page
Our blog already has three pages:
index.markdown: the home page of our siteabout.markdown: an about page that we can access from the header_post/yyyy-mm-dd-welcome-to-jekyll.markdown: an example of a blog post
The beauty of Jekyll is that all pages are build using markdown, which is more readable than HTML and easy to reuse elsewhere.
For instance, I often start writing my posts using Notion and then export them in markdown. And a lot of blogging platforms, like dev.to or hashnode, use this language for their post editor.
Jekyll also creates the navigation of the website automatically, whether you are adding a static page or a blog post.
The home page, which corresponds to the index.markdown file, displays the list of blog posts by default. If you look at its content, you will see that this file is almost empty. Indeed, all the logic behind the display of the blog posts list is hidden in the home layout.
We can update the file to custom our home page, for instance, by changing the title above the list of posts using the property list_title.
Moreover, we can add a welcome message on top of our page. We just need to add some content to the file, and it will be automatically placed above the post list.
Finally, I also added the property title: '' as a trick to avoid Jekyll using the first heading of my content as title and putting it in the header.
Here is the updated code of the file.
<!-- index.markdown -->
---
layout: home
list_title: Read Our Latest Posts
title: ''
---

# Github Pages Demo Blog

Welcome to this demo blog!

This website intends to show you how to easily build and
deploy a portfolio with a blog using _GitHub Pages_ and _Jekyll_.

You can find the sources of this project
[here](https://github.com/SimonDosda/gp-blog).
Adding a static page that showcases our best GitHub repositories
Let’s add another static page to our project. If you see this website as your portfolio, something interesting to add is a showcase of your public GitHub repositories.
To do so, create a new file projects.markdown in the root folder.
The first thing to do is filling up the Front Matter metadata (the part in between dashes).
In our case, we indicate for the page a title and permalink of projects.
---
layout: page
title: Projects
permalink: /projects/
---
GitHub Pages allows you to easily loop on your public repositories, as they are accessible from the variable site.github.public_repositories. Jekyll uses Liquid templating language to manage variables and statements. It allows us to loop over our repositories.
To filter on my most interesting repositories, I only display repositories that are not forked and contain topics. Feel free to use the conditions that suit you the best.
I then display the repository name, description, list of topics, and last update date. The title also links to the repository URL.
Here is the code and the result.
{% for repo in site.github.public_repositories %}

{% if repo.fork == false and repo.topics.size > 0 %}

## [{{ repo.name }}]({{ repo.html_url }})

{{ repo.description }}

Topics: {{ repo.topics | array_to_sentence_string }}

Last updated: {{ repo.updated_at | date_to_string }}

{% endif %}

{% endfor %}
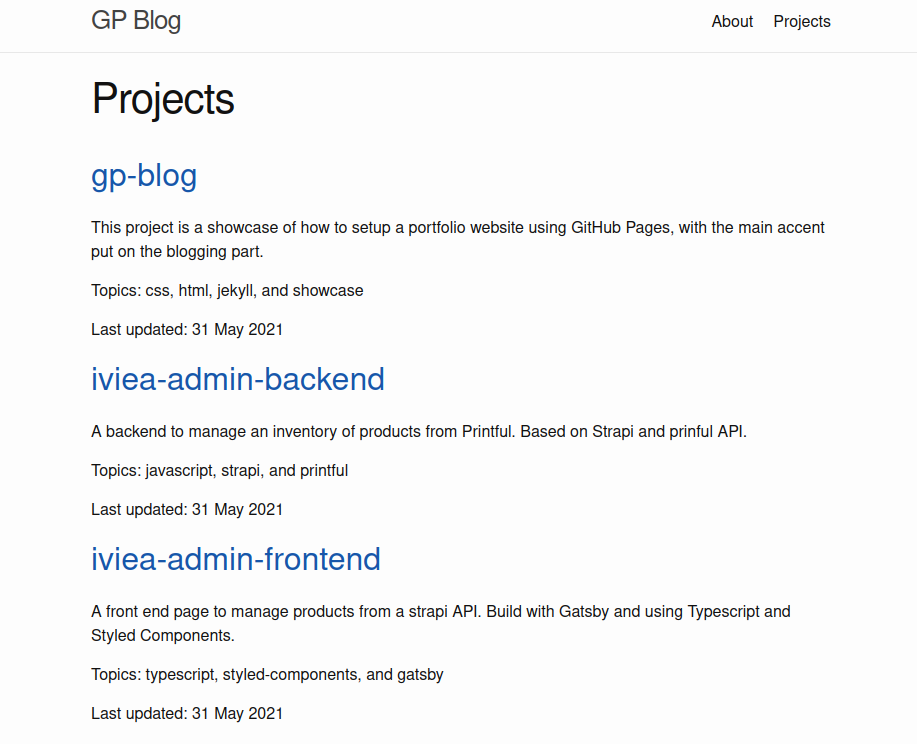
Notice that the Projects link was added automatically to the navigation bar.
Adding a blog post
Our blog already contains a welcome blog post created by Jekyll when we initialized the project.
Let’s add another one to see the main functionalities you will probably use in your posts: titles, code, and images.
As the welcome post states, creating a new post requires creating a new file with the template yyyy-mm-dd-title.markdown.
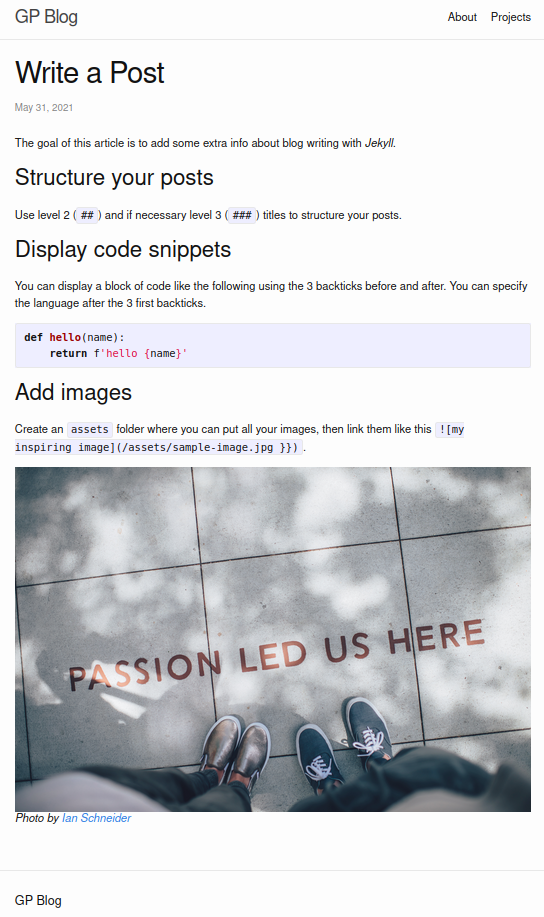
Let’s create a new blog post explaining furthermore how to write one. Go ahead and create a file 2021-06-01-write-a-post.markdown in the _posts folder.
---
layout: post
title: "Write a Post"
date: 2021-06-31
categories: jekyll blogging
---
The goal of this article is to add some extra info
about blog writing with _Jekyll_.
## Structure your posts
Use level 2 (`##`) and if necessary level 3 (`###`) titles
to structure your posts.
## Display code snippets
You can display a block of code like the following using triple backticks.
You can also specify the language after the first triple backticks.
```python
def hello(name):
return f'hello {name}'
```
## Add images
Create an `assets` folder where you can put all your images,
then display them with a link starting with an exclamative mark like this:
``.

_Photo by [Ian Schneider](https://unsplash.com/@goian)_
The first things provided are the Front Matter metadata. Only layout: post and title are mandatory, but you can also add the date, categories, author, and so on. You can see more details here.
We then have our article written in markdown, where I display a few extra tips.
Below is the corresponding result.
You now know the basics of content management for your blog.
You can find the code for this part here.
Our next step is now to customize the appearance of our website.
Comments
None
Nice
Leave a Comment