Add A Comment System To A Jekyll Blog Using Staticman - 1 / 2

This article is part of a series showing you how to quickly and freely build and host your own Jekyll blog on GitHub Pages. This series will also cover more advanced topics like adding a comment system directly in our code using Staticman and adding privacy-friendly but still free analytics using Umami.
I divided the tutorial into several parts:
- Introduction
- Setting Up
- Create Content
- Customize Display
- Commenting System - Part 1 <- you are here
- Commenting System - Part 2
- Analytics
Now that we have our blog, let’s see how to add some interactivity to it with a commenting system.
How a static website can become dynamic
Adding a commenting system to a Jekyll website is tricky as it is a static site generator, with no backend allowing us to store comments in a database and serve them.
The immediate solution to solve this issue is to use an external service with its own database. Among the popular ones, disqus is often used with Jekyll. It has the advantage of being easy to implement, as it is a script loaded on your page, but it also presents privacy issues and displays ads in its free version.
Another possible solution to add dynamic content to a GitHub website is to use staticman. On the opposite of the previous solutions using external databases, staticman creates files in your repository, updating your website statically. It is free and open-source but not as straightforward to implement as disqus. The nice thing is that it will store all your comments in your git repository, so there is no risk of losing them.
As we are courageous, this is the solution we will implement for our website.
Deploying Staticman on Heroku
In order to use staticman, we need to deploy it on a server. This app will be used as a proxy to receive our comments and create files in our repository.
We will use Heroku to deploy our staticman instance. You might need to create an account first if you don’t have one.
Hence this is done, go to the staticman GitHub repository and fork it.
On your Heroku dashboard, go to New -> Create new app, type the name that you want for your app, and hit Create app.
In the Deployment method of the Deploy tab, click on GitHub. Once connected, choose the staticman repository and hit Connect.
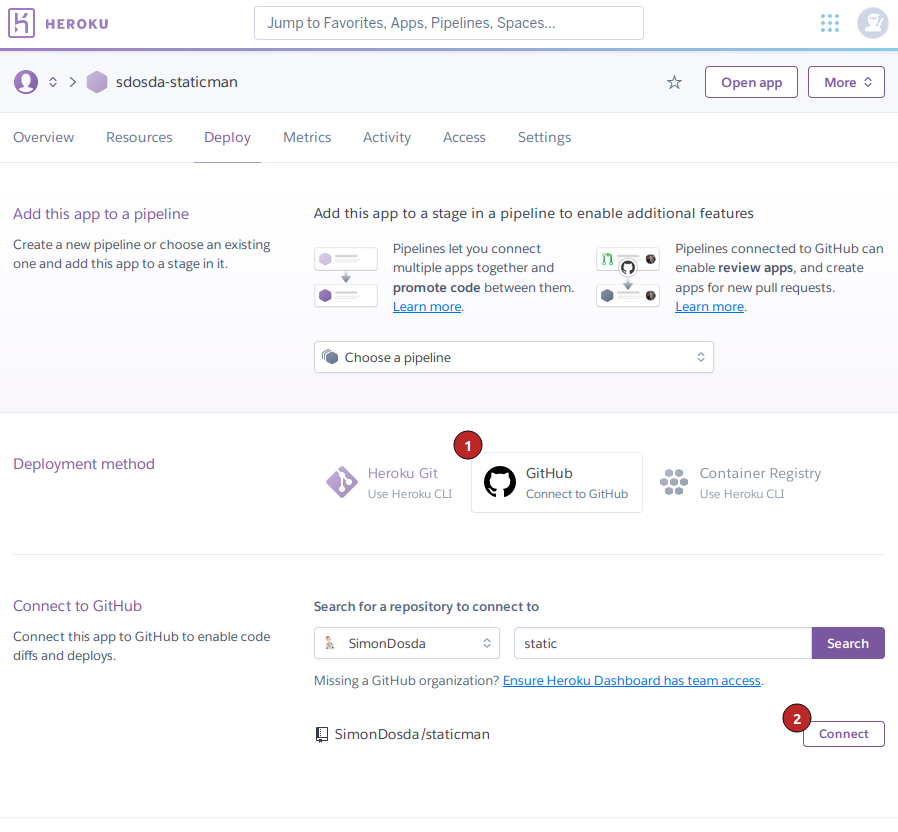
Once this is done, you can go to the Manual deploy section and click on Deploy Branch.
This will deploy an application to https://<app-name>.herokuapp.com/.
There should be an error displayed. It is expected as we haven’t configured it yet. We will take care of it now.
The app will need to be able to access your GitHub repository. To do so, create a new application in GitHub Settings → Developer settings → GitHub Apps.
Create an app with the following inputs:
- Homepage URL:
https://staticman.net/ - Webhook URL:
https://<app-name>.herokuapp.com/v1/webhook - Repository permissions / Contents:
Access: read and write - Repository permissions / Pull Requests:
Access: read and write - Subscribe to events:
Pull request
Once your app is created, go to General → Private keys and hit Generate a private key.
Finally, go to Install App and hit Install.
Go back to Heroku. Now it is time to configure our app.
In Settings -> Config Vars, create the following variables:
GITHUB_APP_ID: the GitHub app id displayed at the beginning of theGeneralsectionGITHUB_PRIVATE_KEY: the private key we just generatedRSA_PRIVATE_KEY: a private key that will be used to encrypt content, you can use the same asGITHUB_PRIVATE_KEY
Go back to the deploy tab and run a manual deployment again.
Once the deployment is over, you should now see a welcome message when you visit your app.
Adding Staticman to our project
We now need to add staticman to our project.
First, we will create a staticman.yml file that defines its configuration as follow.
# staticman.yml
comments:
  # (*) REQUIRED
  #
  # Names of the fields the form is allowed to submit. If a field that is
  # not here is part of the request, an error will be thrown.
  allowedFields: ["name", "message"]

  # (*) REQUIRED
  #
  # Name of the branch being used. Must match the one sent in the URL of the
  # request.
  branch: "main"

  # Text to use as the commit message or pull request title. Accepts placeholders.
  commitMessage: "Comment from {fields.name} on {options.slug}"

  # (*) REQUIRED
  #
  # Destination path (filename) for the data files. Accepts placeholders.
  filename: "entry{@timestamp}"

  # The format of the generated data files. Accepted values are "json", "yaml"
  # or "frontmatter"
  format: "yaml"

  # List of fields to be populated automatically by Staticman and included in
  # the data file. Keys are the name of the field. The value can be an object
  # with a `type` property, which configures the generated field, or any value
  # to be used directly (e.g. a string, number or array)
  generatedFields:
    date:
      type: date
      options:
        format: "timestamp-seconds"

  # Whether entries need to be approved before they are published to the main
  # branch. If set to `true`, a pull request will be created for your approval.
  # Otherwise, entries will be published to the main branch automatically.
  moderation: false

  # When allowedOrigins is defined, only requests sent from one of the listed domains will be accepted.
  allowedOrigins: ["localhost", "simondosda.github.io"]

  # (*) REQUIRED
  #
  # Destination path (directory) for the data files. Accepts placeholders.
  path: "_data/comments/{options.slug}"

  # Names of required fields. If any of these isn't in the request or is empty,
  # an error will be thrown.
  requiredFields: ["name", "message"]
You might have to change the name of the branch from which you are deploying and you will have to update the allowedOrigins value with your domain name or remove it if you don’t feel like you need this security.
This post will focus on building a simple comment system where any user can enter a name and a message in markdown. We will allow them to respond to other messages as well.
Staticman allows you to check for spam automatically, send email notifications, and implement Recaptcha, but we won’t cover this here.
In the _config file, add the following entry, with your own app name, github username, repo and branch.
# _config.yml
staticman_url: https://<app-name>/v3/entry/github/<username>/<repo>/<branch>/comments
Creating the input form
We will now build the form where our readers will be able to write their names and comments.
In the _includes folder, add a new comment-form.html file.
<!-- _includes/comment-form.html -->
<form method="POST" action="{{ site.staticman_url }}" class="comment-form">
  <input
    name="options[redirect]"
    type="hidden"
    value="{{ page.url | absolute_url }}"
  />
  <input name="options[slug]" type="hidden" value="{{ page.slug }}" />

  <textarea
    class="comment-message"
    name="fields[message]"
    placeholder="Comment (markdown accepted)"
    required
  ></textarea>
  <div class="comment-bottom">
    <input
      class="comment-name"
      name="fields[name]"
      type="text"
      placeholder="Name"
      required
    />
    <button class="comment-submit" type="submit">SEND</button>
  </div>
</form>
What we just did is that we set up a form that will send data to the staticman_url.
As we defined in our staticman.yml config file, our comments are based on 2 fields:
name: the name of the sender, defined by<input name="fields[name]" required>message: the content of the comment, define by<textarea name="fields[message]" required></textarea>
We also provide two options when we validate the form, defined by hidden inputs:
redirect: the URL to be redirected to once the submit call will complete. Here we come back to our pageslug: the slug of the page that will be used to create the comment folder, as we defined ourpathas"_data/comments/{options.slug}"in thestaticman.ymlconfiguration file
Displaying the list of comments
Comments sent to our repository will be stored in the _data/comments/<slug> directory.
The way to access them in Jekyll is with the variable site.data.comments[page.slug].
Let’s create a comment-list.html file in our _includes folder to display them.
<!-- _includes/comment-list.html -->
{% assign comments = site.data.comments[page.slug] | where_exp: "item", "true" %}
{% assign sorted_comments = comments | sort: 'date' %}
{% for comment in sorted_comments %}
<div class="comment">
<h3>{{comment.name}}</h3>
<time
class="post-meta dt-published"
datetime="{{ page.date | date_to_xmlschema }}"
itemprop="datePublished"
>
{%- assign date_format = site.minima.date_format | default: "%b %-d, %Y" -%}
{{ comment.date | date:"%H:%M - %b %-d, %Y, %Y" }}
</time>
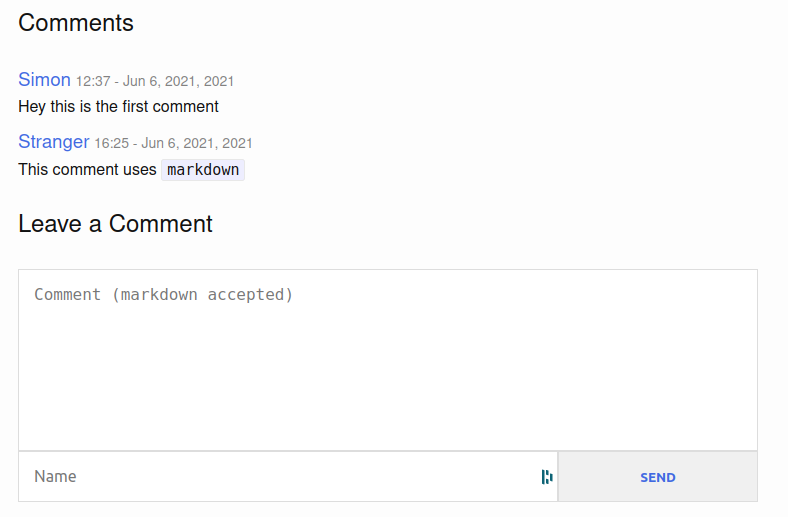
<p>{{comment.message | strip_html | markdownify }}</p>
</div>
{% endfor %}
What we do here is looping over the page comments sorted by date. The first line with the where_expression filter is required to get the comment values.
For each comment, we display the name, date and message with the strip_html filter to secure the message and the markdownify filter to render markdown.
Adding the comments block
We now have everything we need for our simple commenting feature.
Let’s add another file in our _include folder named comments.html that will wrap together our two comments snippets: posting a new comment and displaying received comments.
<!-- _includes/comments.html -->
<section class="comments">
  {% if site.data.comments[page.slug] %}
  <div>
    <h2>Comments</h2>
    {% include comment-list.html %}
  </div>
  {% endif %}

  <div>
    <h2>Leave a Comment</h2>
    {% include comment-form.html %}
  </div>
</section>
Now we can update our _layout/post.html file to display these comments instead of the disqus comments.
<!-- _layout/post.html -->
...
<div class="post-content e-content" itemprop="articleBody">{{ content }}</div>

{% include comments.html %}

<a class="u-url" href="{{ page.url | relative_url }}" hidden></a>
...
Style our comments
Before pushing our brand-new feature, let’s add some style to our comments.
As it is a separate feature, the best option is probably to create its own CSS file. Let’s create a new comments.scss in the sass file and add the import line @import "comments"; in assets/main.scss.
// _sass/comments.scss
.comment {
  padding-top: 10px;
  h3 {
    display: inline;
    color: royalblue;
  }
  p {
    margin: 0;
  }
}

.comment-new {
  margin-top: 25px;
}

.comment-form {
  display: flex;
  flex-direction: column;
  margin-top: 25px;

  .comment-message,
  .comment-name {
    font-size: 16px;
    padding: 15px;
    border: 1px solid #ddd;
    margin: 0;
  }

  .comment-message {
    min-height: 150px;
    resize: none;
  }

  .comment-bottom {
    display: flex;
  }

  .comment-name {
    flex: 1;
  }

  .comment-submit {
    width: 200px;
    border: 1px solid #ddd;
    color: royalblue;
    font-weight: bold;

    &:hover {
      cursor: pointer;
    }
  }
}
We can now go ahead and deploy our comment system.
When you send a comment, it should open a merge request that will be automatically validated if you set moderation: false in the staticman configuration file.
Our comment system is now functional!
You can find the code for this part here.
This comment system is still very basic, our next step will be to add some features like allowing to reply to a comment or adding a markdown editor.
Comments
Juan
Good day! I know this is kinda off topic bbut I was wondering if you knew where I could get a captcha plugin for my comment form? I’m using the same blog platform as yours and I’m having troubble finding one? Thanks a lot! francuski
Simon
Hello Juan. I guess you can check this repo from Eduardo Boucas, the creator of staticman: https://github.com/eduardoboucas/staticman-recaptcha, where he shows how to integrate it.
Jeandavis
Hey, thanks for sharing this information with us
Simon
my pleasure
Artem
Simon, hello Can you help sort out the
comment-list, I can make a comment and get a pull request, but can’t get comments out of_data/commentsto the blog page. Here’s my github https://github.com/woohung/woohung.github.io/tree/main/_includesMaybe I’m doing something wrong.
Simon
Hi Artem, I am not sure but that might be because you are not using the
github-pagesgem (https://github.com/SimonDosda/gp-blog/blob/step-4.1-comment/Gemfile#L15) Hope it helps.Artem
Didn’t help, unfortunately. Let me try to clarify the question, what is the mechanism to show comments from
_data/comments? Where do I start digging into the question?Simon
It is based on the data files management by Jekyll: https://jekyllrb.com/docs/datafiles/
haley
good article very useful
Simon
Thank you Haley
Daanii
Hi! First of all, this is an amazing tutorial. Second, i have a problem. After pressing “Send” it goes to the staticman url on heroku but it gives me application error. The main page of the heroku app is alright (it shows welcome message from staticman). I think i followed everything right.
Simon
Hi Daanii, thanks a lot! I can’t really help you with so little information, but I advise you to look at the heroku’s logs, it should help figuring out what is happening.
Bill
I have the same issue as Daanii very strange
newUser
Did you find the solution to it !?
Leave a Comment