Manage Your Terminals With Tmux

Photo by Levi Stute.
If you often need to use several terminals, you probably have already felt the need to manage them more easily.
Indeed, as one of our main tools, enhancing our use of the shell is of great benefit to us as developers.
This is the reason why, following my post on the z shell, I want to share my setup with you to transform the pain of launching and using multiple terminals into a much more enjoyable experience.
Why use a terminal multiplexer?
If you are a developer, the terminal is probably part of your tool belt. Unfortunately, the base terminal is a bit well…limited.
Thankfully, there are several kinds of software that tackle this problem, allowing us to group our shells, organize them and switch from one to another seamlessly.
These software products are divided into two categories, terminal emulators and terminal multiplexers. Let’s look at the main differences between them.
Mouse-based Emulators
These programs will allow you to emulate several terminals in their window.
They are straightforward to install and use. I call these emulators mouse-based because they allow you to carry out all their functions with a mouse, like resizing each terminal or adding a new tab.
It is a great and easy way to start using multiple terminals. The most famous one is Terminator, and it is already installed on a lot of Linux distros.
 Example of a Terminator display
Keyboard-based Multiplexer
Contrary to emulators, multiplexers are not stand-alone software but instead are launched in a terminal.
I call them keyboard-based because it is the primary way to use them, you might have some mouse support, but it will be very light. This means that there is a bit of a learning curve before being able to use them.
So why should I bother?
Please don’t leave yet! They do have several advantages over terminal emulators. How about we take a look at them, and I let you decide if they fit your usage.
Since a terminal multiplexer lives in a terminal, it can be used everywhere you can open a terminal, say, for example, a remote server on which you login through ssh.
It is handy as a terminal multiplexer opens a server that keeps your terminal in a session when you launch it. This allows you to connect to a remote server, enter some long-time running commands, disconnect from the server but still be able, when you log back, to reopen this session as it was.
It also means terminal multiplexers can share a session with other users or yourself; for example, to have the same terminal displayed on several windows or workspaces on your computer.
Furthermore, customization capabilities are almost endless and allow you to shape it to your needs.
Last but not least, you will eventually end up being much more efficient only using your keyboard.
The two main terminal multiplexers are screen and tmux, which are very similar. Tmux is a bit more recent and my object of focus in this post.
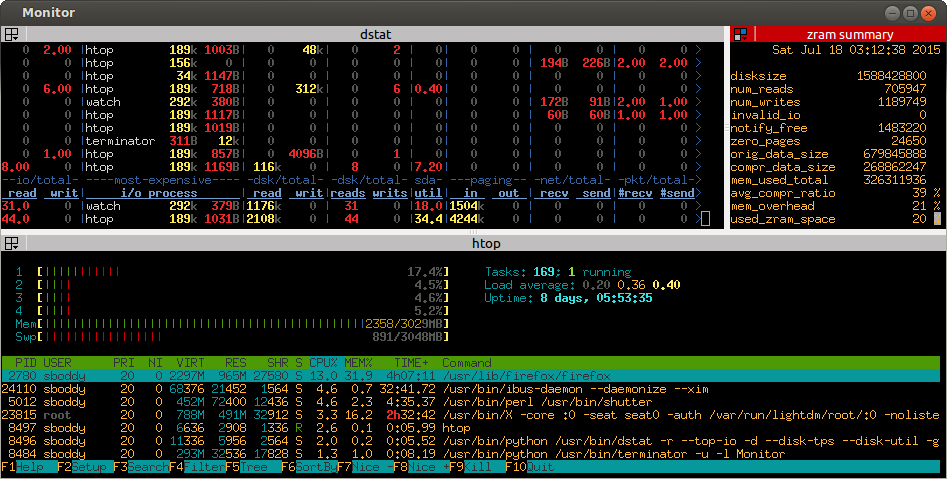
 Example of a tmux display
How to install and use tmux?
Before using tmux, you will need to install it, which should not be a headache. On a Debian system, it is done with the following command.
sudo apt install tmux
Once tmux is installed, you will be able to create a session.
But first, let me explain the lingo behind tmux with this schema.
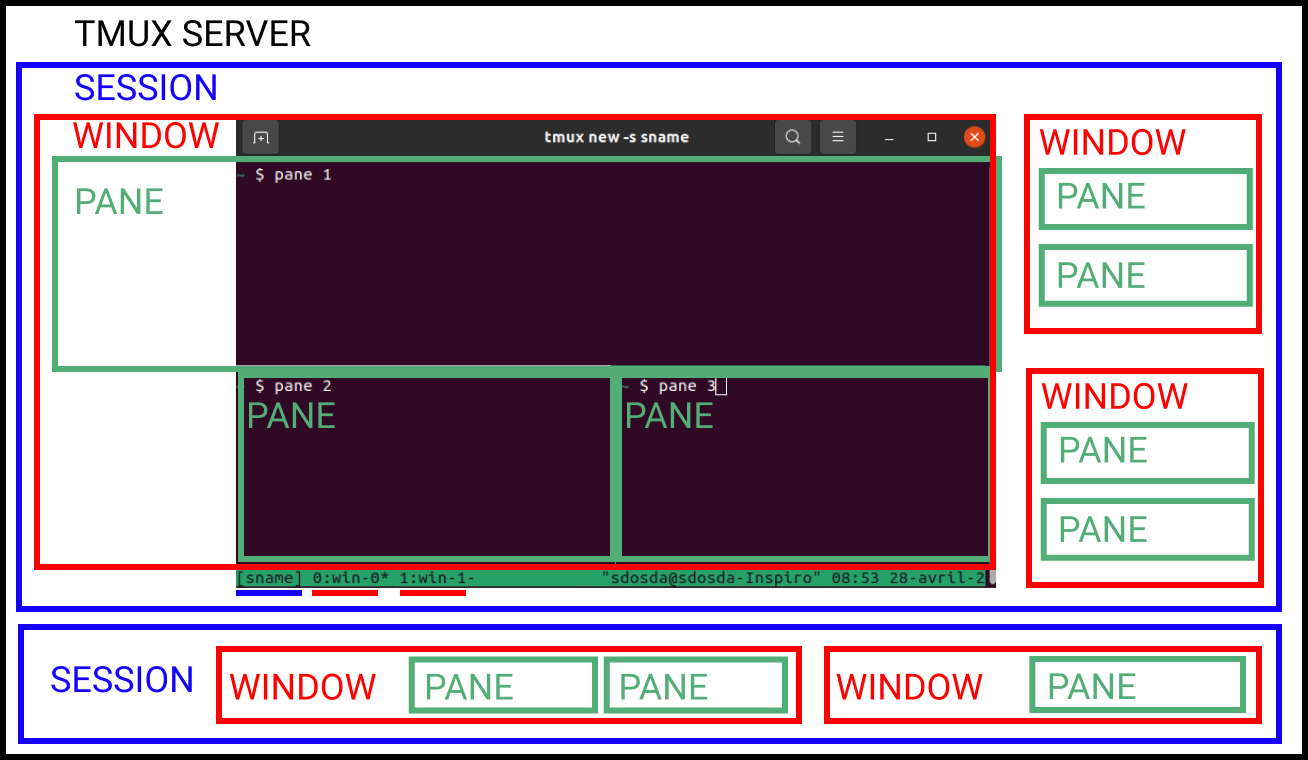
When you install tmux it will launch a server.
This server will allow you to manage sessions. On one terminal you will be attached to one session.
Command tmux will start a new unnamed session, whereas tmux new -s <session-name> allows you to begin a new session with the corresponding name. You can also rename it by typing Ctrl-b + $. You can detach from a session by typing Ctrl-b + d, see the sessions started with the command tmux ls, and attach to one with the command tmux attach -t <session-name>.
Once you are in a session, you will be able to create several windows in it.
A window is displayed on the whole terminal window (hence the name) and can contain several panes.
Finally, a pane is what contains a terminal!
You can create a new window with the command Ctrl-b + c, go to the next one with Ctrl-b + n, or to the previous one with Ctrl-b + p.
Then you have the liberty of creating and arranging as many panes as you see fit. Unfortunately, shortcuts for the panes are not very convenient (at least that’s my opinion), so I won’t put them here, but I will show you how to configure them in the next section.
For all the main commands, you can use a tmux cheat-sheet like the one at tmuxcheatsheet.com.
Customizing tmux to your needs
Tmux offers a lot of customization: you can change all the key bindings, tune its appearance, add scripts, and so on.
To do so, you just need to edit the configuration file at ~/.tmux.conf.
Changing the prefix
The first thing you might want to change is the prefix.
You probably noticed that all the shortcuts I gave you so far started with Ctrl-b, which is the default prefix for tmux, needed before any command.
You can change it to another letter (be careful not to collide with a system shortcut, though) with the following lines (to change it to Ctrl-a here).
# remap prefix from Ctrl-b to Ctrl-a
unbind C-b
set-option -g prefix C-a
bind-key C-a send-prefix
Changing the split-window commands
Remember when I told you that the shortcuts for panes were not very convenient? Here is an excellent example with the split-window ones.
Splitting a window vertically is done with prefix + " and horizontally with prefix + %, which is not very easy to remember. A common change for these ones is to use more visual bar keys, like - and |.
# split panes using | and -
bind-key | split-window -h -c "#{pane_current_path}"
bind-key - split-window -v  -c "#{pane_current_path}"
unbind-key '"'
unbind-key %
Notice that I have also added the option -c "#{pane_current_path}". This will use your current path when creating a new pane instead of your home path.
Adding switch panes shortcuts
For switching from one pane to another, using the prefix can be pretty cumbersome. However, this is an action you want to carry out seamlessly.
What you can do is add direct shortcuts. By direct, I mean that you won’t need to type the prefix before.
To do so, you need to add the option -n to the bind-key command.
Personally, I add shortcuts that allow me to easily navigate between my panes using arrows or vim keys while holding the control key.
# switch panes using Ctrl + arrow without prefix
bind-key -n C-Left select-pane -L
bind-key -n C-Right select-pane -R
bind-key -n C-Up select-pane -U
bind-key -n C-Down select-pane -D
# switch panes using Ctrl + vim keys without prefix
bind-key -n C-h select-pane -L
bind-key -n C-l select-pane -R
bind-key -n C-k select-pane -U
bind-key -n C-j select-pane -D
# toggle zoom using Ctrl + z
bind-key -n C-z resize-pane -Z
That’s much more efficient! You can do the same for navigating between windows.
# switch window using Ctrl + p/n without prefix
bind-key -n C-p previous-window
bind-key -n C-n next-window
Copy/Paste with vi commands
Tmux allows you to switch to a copy mode, in which you can scroll up through your terminal display, search for a specific text and copy a part of the text, among other features.
To switch to copy mode, type prefix + [. You can choose between 2 sets of commands to navigate in copy mode, either using vi or emacs keys.
I am personally used to vi keys, so this is the one I use. I even enforce some commands to be closer to the vi ones.
# vi copy/paste mode
set-window-option -g mode-keys vi
bind-key -T copy-mode-vi 'v' send-keys -X begin-selection
bind-key -T copy-mode-vi 'y' send-keys -X copy-selection-and-cancel
Once in copy mode, I can navigate the history using vi controls, start a selection with the v key, copy it with y, then paste it in your terminal using prefix + ].
Very useful!
You can get the details of my .tmux.conf config file on my github config files repository.
Launching a predefined session quickly with tmuxp
Now that we have configured tmux and are starting to be comfortable with all its commands, let me present you a tool that will dramatically reduce the time it takes you setting up your environment for a project.
This tool is a tmux environment manager called tmuxp. Basically, it allows you to define your environments in files and then launch them for you, instead of creating custom new windows every time.
It is a python package and hence is installed using pip.
pip install tmuxp
You can then create tmuxp environment files in yaml and put them in the ~/.tmuxp directory.
Let me show you how to do it with a commented example.
# ~./tmuxp/advanced-react.yaml
session_name: advanced-react # name of the session
windows: # list all windows
  - window_name: backend # name of the window
    layout: even-vertical # how panes are displayed
    shell_command_before: # list of commands that will run in every panes
      - cd ~/Workspace/advanced-react/backend
    panes: # list of panes
      - shell_command: # list of commands for the pane
          - npm run dev
      - shell_command:
          - code .
          - git status
  - window_name: frontend
    layout: even-vertical
    shell_command_before:
      - cd ~/Workspace/advanced-react/frontend
    panes:
      - shell_command:
          - npm run dev
      - shell_command:
          - code .
          - git status
You can then launch this session by typing tmuxp load advanced-react and you will get, in this case, a session called advanced-react with two windows, each containing two panes spread vertically, running npm commands, opening vscode and displaying git status.
Of course, it is up to you to define your environments, depending on the kind of projects you are working on and how you like to organize things. The possibilities are endless!
Final words
If it is the first time you have come across tmux, you might feel overwhelmed right now. In this article, I did my best to stick to what I use daily and what saves me time while programming.
Take your time to understand how it works, and once you are comfortable with the basics, feel free to explore all the possibilities with tmux.
If you already are a tmux user, I am curious to know the main functionalities you find helpful. I would be glad to hear about them in the comments.
Leave a Comment